

When looking at modern Client Management Solutions nearly everything is cloud-driven. So the question is, is it necessary to replace your traditional Management Solution with a modern Management Solution? The answer to this question depends on multiple factors and there is no simple answer like „yes“ or „no“.
In this blogpost we are looking on how we can combine a traditional management solution to make use of modern management capabilities. This includes OS deployment through the cloud with Driver Management for different vendors like HP, Lenovo, DELL and Microsoft.
OSD Cloud can also be used as a standalone solution without Symantec CMS or any other 3rd party Management Solution.
The challenge
Currently Symantec´s Deployment Solution is not able to install an OS over the cloud because the PECTAgent in WinPE is not able to communicate with the SMP server through the CEM gateway.
I´ve created a Feature Request for this, but it is still not available in the product yet.
I hope it is only a matter of time when Symantec “enables” this feature because everything is prepared to make it possible (PECTAgent uses Communication Profiles, PECTAgent is able to communicate through HTTPS…)
Solution
When I started to evaluate the options for a Cloud OS Deployment, I discovered that a solution for the challenge already exists and I only have to adopt the solution (OSDCloud) from David Segura to fit into the Symantec Client Management Suite Product.
In this blogpost you will find a step-by-step procedure to make OSDCloud working with the Symantec Client Management Suite – especially the Deployment Solution.
Limitation
The limitation of the current provided Blogpost is that your client(s) still needs to be connected to the Corporate Network (where your SMP Server resides) when deploying the OS through the cloud because of the limitation described above. If the PECTAgent is able to communicate through the CEM gateway, it will be practically possible to use a USB Stick without being connected to the Corporate Network.
Currently you can do the same without deploying the OS from the Cloud with your Symantec Client Management Suite but I´m sure in the future this scenario gets more and more interesting for different companies (i.e. for a branch office without any infrastructure) – take a look on my comments in the Feature Request.
Requirements
Create a OSDCloud.iso using David Segura´s instructions – start here.
Quickstart
Download the Windows ADK for Windows 10, version 2004
Download the Windows PE add-on for the ADK, version 2004
Open PowerShell as Admin:


- Installed and configured Symantec Client Management Suite
- Unattend.xml file (you can create one with Windows System Image Manager part of the Windows ADK)
- Installed and Configured Cloud Enabled Management (CEM)
This is optional and only necessary if you want to manage your computer after the OS installation
- A CEM Installation Package File
OS Deployment with Symantec Client Management Suite leveraging David Segura´s OSDCloud Solution
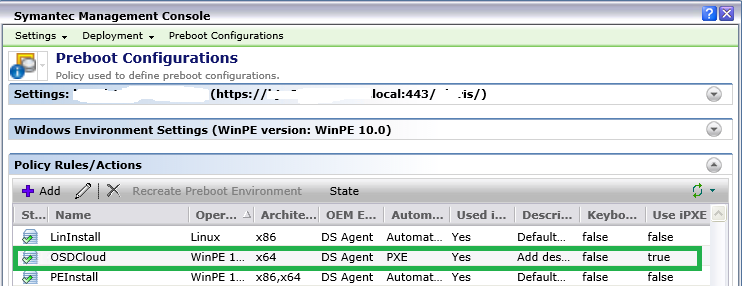
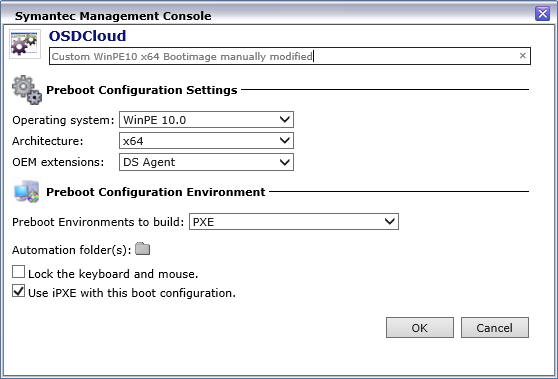
1. In the Symantec Client Management Suite create a new Preboot Environment called OSDCloud
(The name doesn´t really matter but to make it easier to follow this blogpost we are using this name…)
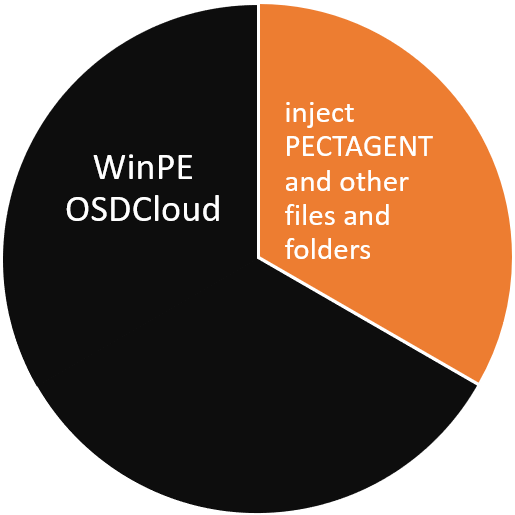
2. To be able to run Jobs / Tasks in OSDCloud WinPE (and allow more flexibility) we need to inject the „Altiris stuff“ (PECTAGENT and other things) into the OSDCloud WinPE boot.wim file created in the requirements. This is needed to be able to manage the OSDCloud WinPE and run Automation Tasks in the OSDCloud WinPE using the PECTAGENT.
It would be a much better approach to integrate the OSDCloud stuff into the Altiris Stuff than vice versa…but that´s another story :).

Create the following folder structure
D:\Preboot\Original
D:\Preboot\OSDCloud
D:\Preboot\Original <- in this folder copy the newly created boot.wim File from
D:\Program Files\Altiris\Altiris Agent\Agents\Deployment\SBS\Images\OSDCloud\x64\sources
D:\Preboot\OSDCLoud <- in this folder copy the boot.wim file (created in the requirements section – you must mount the OSDCloud.iso file to get the boot.wim file from the sources directory)
3. Create Folder called MNT under C:\Preboot\Original and C:\Preboot\OSDCLoud
4. Mount the boot.wim File from D:\Preboot\Original into the D:\Preboot\Original\MNT Folder using this command:

5. Do the same for the boot.wim File in D:\Preboot\OSDCloud into D:\Preboot\OSDCloud\MNT Folder

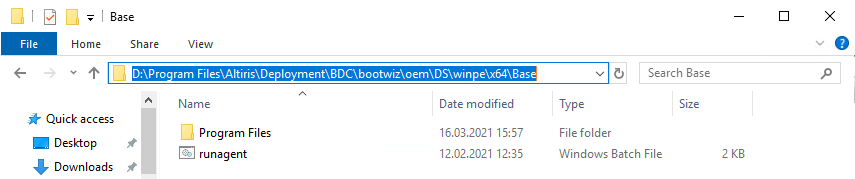
6. Copy the content of D:\Program Files\Altiris\Deployment\BDC\bootwiz\oem\DS\winpe\x64\Base to your mounted boot.wim File in D:\Preboot\OSDCloud\mnt (do not override – file and folder just missing files and folders….)
7. Copy missing files and folders from D:\Preboot\Original\mnt to D:\Preboot\OSDCloud\mnt
make sure to copy C:\Preboot\Original\mnt\Windows\System32\startnet.cmd and C:\Preboot\Original\mnt\Windows\System32\startutl.cmd to D:\Preboot\OSDCloud\mnt\windows\system32
8. When finished, unmount both boot.wim Files but make sure you use “/commit” for the mounted boot.wim File in the OSDCloud Directory

9. Copy the modified boot.wim File from D:\Preboot\OSDCloud to D:\Program Files\Altiris\Altiris Agent\Deployment\SBS\Images\OSDCloud\x64\sources
(override the existing boot.wim File.)
Now you have finished the Preboot Part!
10. On your SMP Server create tasks and a job to use the OSDCloud (here is an example…)
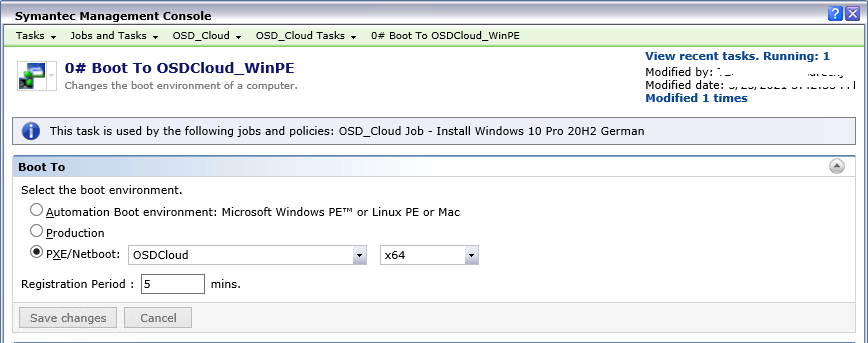
As usually, create a „Boot to OSDCloud” task first
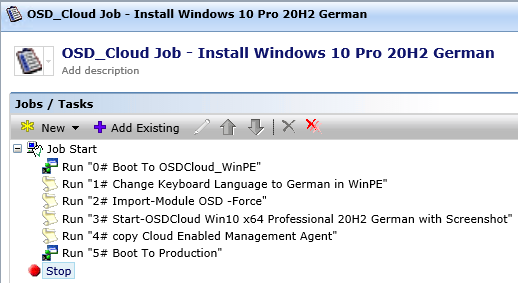
11. Boot to OSDCloud_WinPE
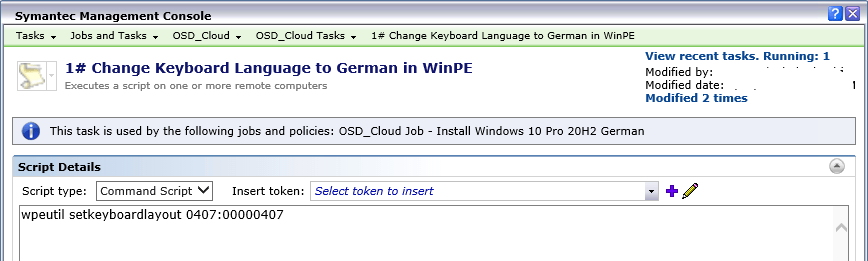
12. Change the keyboard language to fit your language (Run Script Task – Script type: Command Script)
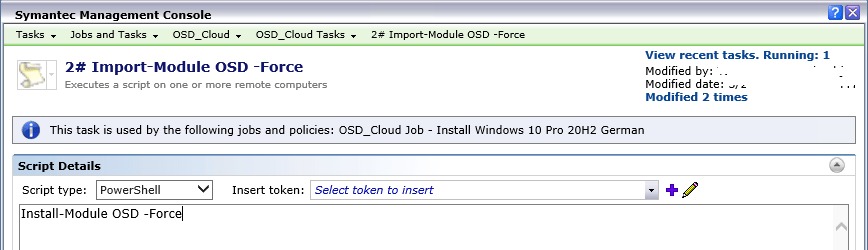
13. Import the OSD Module (Run Script Task – Script type: PowerShell)
14. Start-OSDCloud using Task Input Parameter (Run Script Task – Script type: PowerShell)
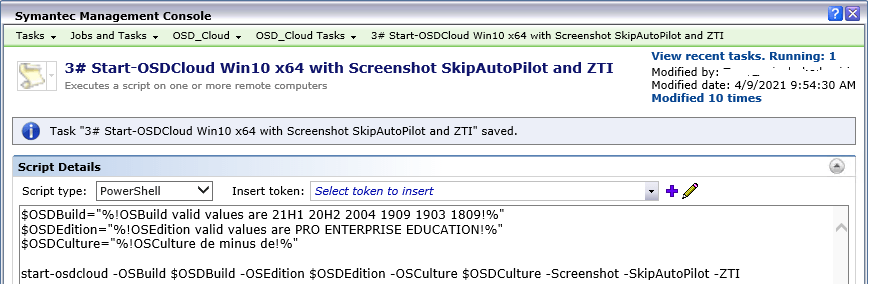
SkipAutopilot will ignore any Autopilot Profiles
ZTI = Zero Touch Installation
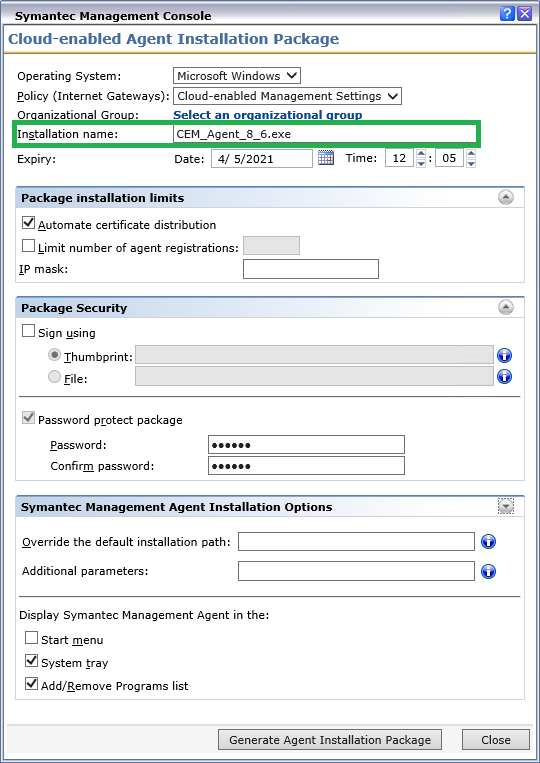
15. Copy Cloud Enabled Management Agent (Run Script Task – Script type: PowerShell)
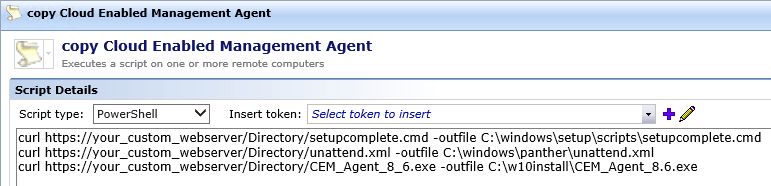
Here you must have a setupcomplete.cmd, unattend.xml and the CEM_Agent_8_6.exe file on a Webserver only if you want to:
- Join your computer to a domain (computer must be connected to a Corporate Network to join to a domain)
- Manage the computer when the OS is up and running (to distribute Jobs / Tasks and Policies) or manage your computer using a 3rd party management solution like Workspace One or any other…
Info: The setupcomplete.cmd file will be called by the OS (before you see the Logon Screen) when the file exists in C:\Windows\Setup\Scripts and this will install the CEM_Agent_8_6.exe or any other management solution agent.
Instead of using the native command CURL you could also use the Save-Webfile function of the OSD Module to download files.
Here is an example:

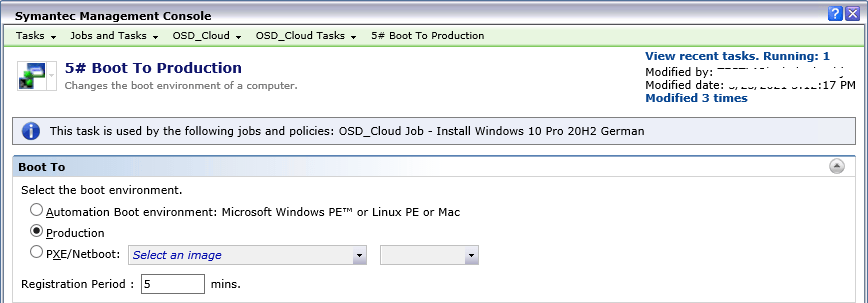
16. Boot to Production
Start the OSDCloud
When starting the OSDCloud Job – if you setup Task Input Parameters – you will see the “New Schedule” Button instead the “Quick Run” Button.
17. When you click on “New Schedule” you should provide the Task Input Parameters, otherwise the job will install the default which is: Windows 10 x64 2009 Enterprise EN-US or you get a selection menu.

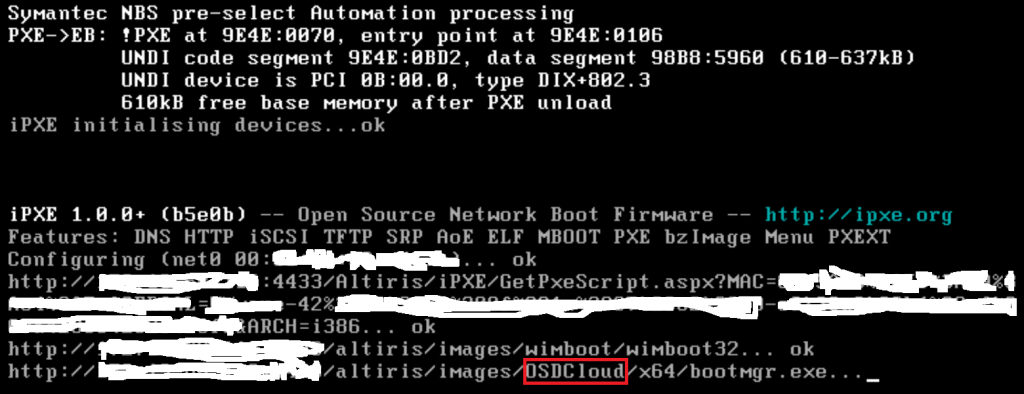
18. If you use iPXE you should see something like this on your client computer where you Schedule the Job
19. Start-OSDCloud will ask you to clear the Disk (only when you have multiple Disks)
20. Start-OSD downloads the Windows 10 Professional 20H2 German ESD File from the Cloud
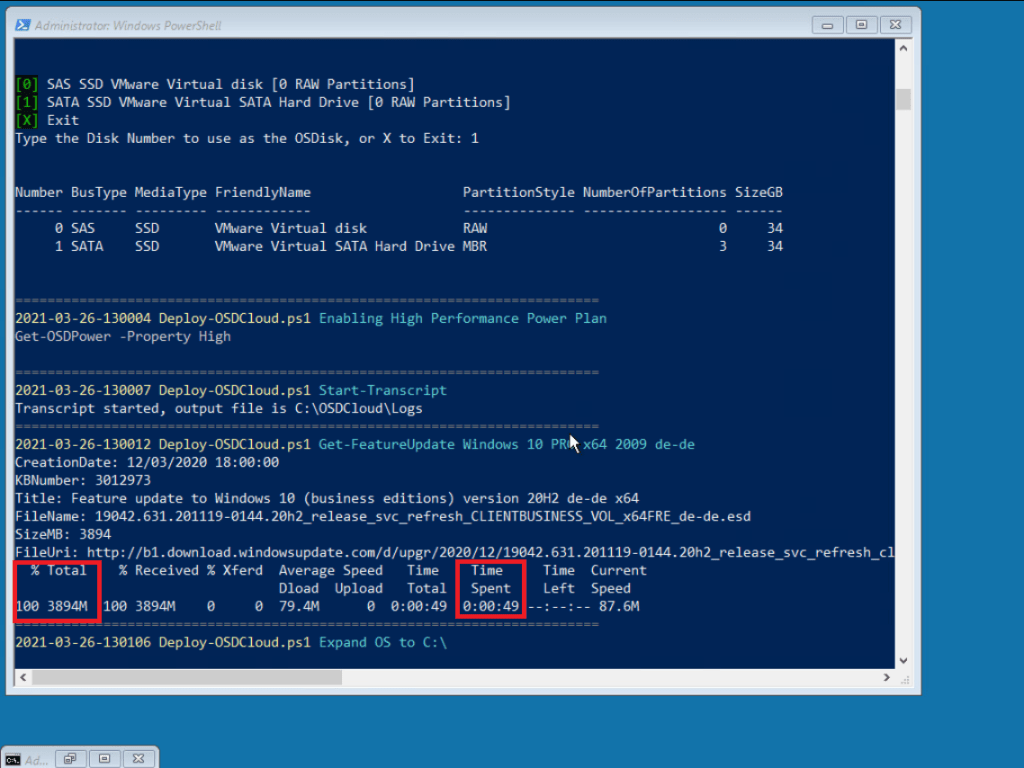
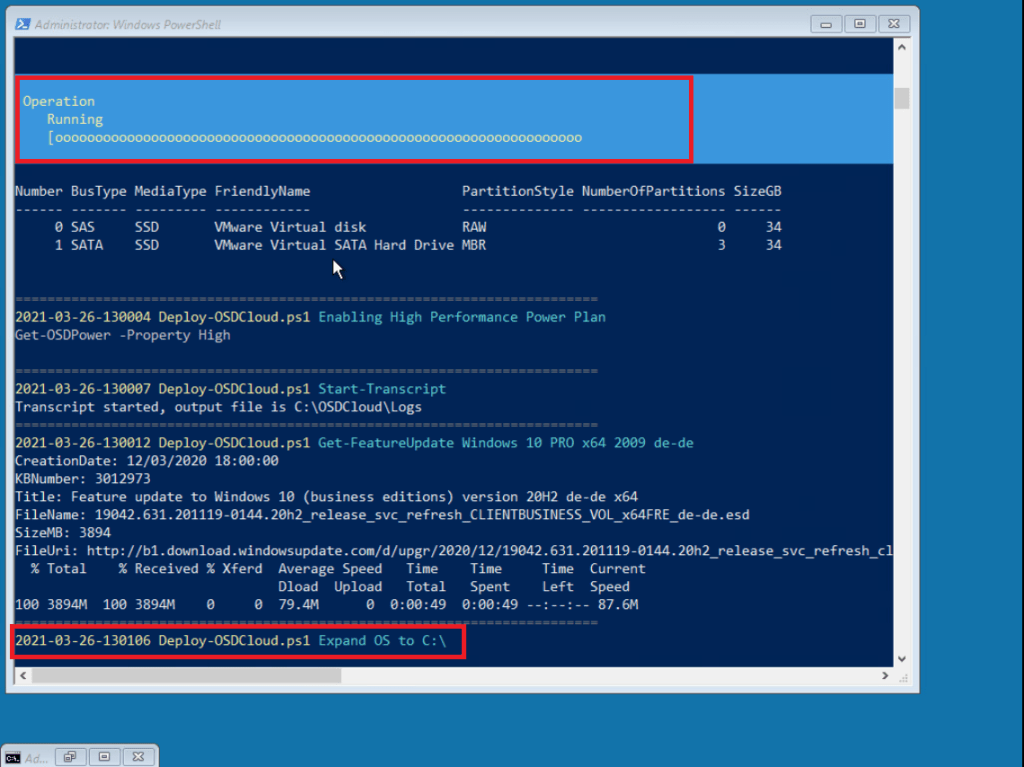
21. The ESD File will be expand to C:\
22. OSDeployment will be finished in ~7 Minutes (depends on your connection speed😊)

- After the OS is applied, the computer restarts and the OOBE phase will be executed (here the unattend.xml file will be used to answer the OOBE questions silently 😊. When specified in the unattend.xml file a domain join will also be made. If you do not specify an unattend.xml file you will be asked to answer the default OOBE questions. Here you could also press Shift+F10 to do some Autopilot stuff…
- Before you see the Logon Screen the setupcomplete.cmd file will be executed with system permissions and the Symantec CEM Agent will be installed. Make sure you have specified the silent switch for the Installer – otherwise it takes forever to get to the Logon Screen.
- Your computer is now able to be managed with your Symantec Client Management Suite over the Cloud. You are now able to use Jobs / Tasks and Policies as the computer is now connected through the Cloud using the CEM Gateway.
It would be extremely helpful if Symantec could enable running Script Tasks through the Gateway when the Client is in WinPE. (In other words, enabling the PECTAGENT to execute run Script Tasks would be extremely helpfull as a first step into an „Everything Cloud“ szenario.)
Big Thanks to David Segura for the amazing work on OSDCloud! OSDCloud got wireless support and many other new features during working on this blogpost.
The options with OSDCloud are widely varied – for example you could also create an offline OSDeployment USB Stick including vendor specific drivers and many many other things. Keep in mind that OSDCloud is still working in progress and more and more things are added by David Segura.
reference links:
OSDCloud the ZTI Way – by Sune Thomsen
Deploying Windows 10 to bare metal devices with just WinPE & internet – by Dean Ellerby
OSDCloud – Image devices without need of infrastructure WIFI and ZTI -by Mattias Melkersen
Combine OSDCloud with Intel EMA (Spanish) -by Octavio Rdz
Trying out Windows 10 Deployment with OSDCloud – by Joymalya Basu Roy
