In the coming months I will post changes and features made into ITMS that are documented but mostly unknown or overseen. This will be a multi part series.
In this series I will show what changes are made in the different RUs and how to make “real-world” usage of the newly introduced features.
Starting with 8.5 RU2 – New Feature: Install Software Updates Task
This new feature introduces the ability to install Security and non-Security Updates without waiting for Patch Management to kick in. This absolutely makes sense when you are installing new Computers and do not want to wait for Patch Management and Policies to install the required or missing updates. It also allows to run pre and post Installation Task before or after installing Patches.
Sometimes it is quite useful to have the ability to run pre and post Installation Tasks – think about stopping / starting a service before or after installing a patch, backup Files and Folders before or after installing patches, or disabling the Monitoring System.
In 8.5 RU2 a new Task type is available to Install Software Updates. This new Task type can be found in the SMP Console -> Manage -> Jobs and Task -> right click on a Folder and select New -> Task -> open Software Folder -> open Patch Management Folder and select Install Software Updates.
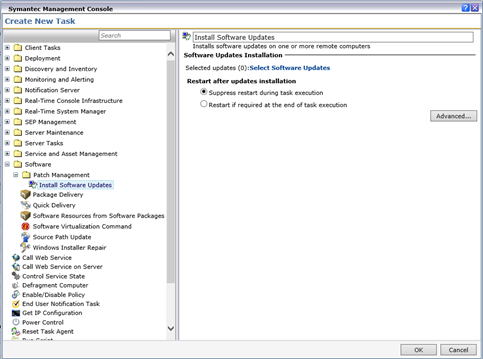
You can select the Updates you want to install, and what should happen when the updates are installed. The two options are:
- Suppress restart during task execution
- Restart if required at the end of task execution
When selecting Software Updates for the installation only the required Updates are installed on the Computer – This new Task type triggers the Distribute Software Updates Task. This Task downloads and stages the software updates.

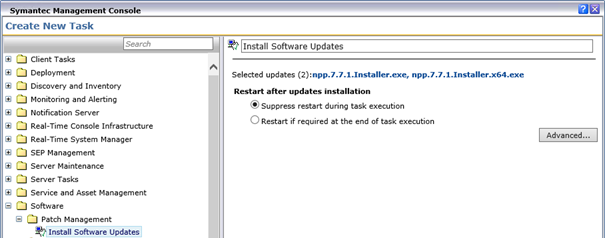
If the Updates are not already downloaded, they are downloaded immediately when you run the Task on a Client Computer (in the background).

Updates are beginning to download, and Collection / Filter / Target Update is forced…

The Software Update Notepad ++ installed successfully with a return code of “0”.

On the SMP Console in the Task Instance Details you could see that the x64 Bit Update was installed instead of x86 because my computer runs a x64 Notepad ++ Version.
Also, the return code “0” is displayed which means that the Update installation succeeded. If I try to run the same Software Update again it will show a different result.
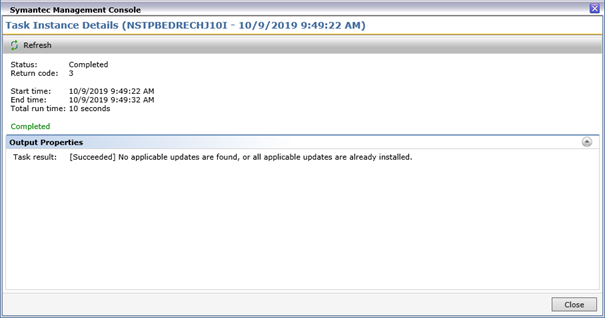
Meaning no applicable updates are found for this computer or all applicable are already installed.
If it fails to install the update(s) it will show a return code of “7”.
For a complete list of return codes please check: DOC11414 it also has some examples for using return codes as conditions within a Job! This should give you an idea on how to use it for your own task. Depending on the return code, we can run additional Tasks that are eventually needed to Backup Files / Folders, Create an Image, Start or Stop Services or anything else.
Additional Information:
On the SMP, the (hidden) automatic system task Clean up Install Software Updates task data runs daily as soon as the Install Software Updates task completes with success or failure. The system task cleans up unused data of completed Install Software Updates task instances. Note that other scheduled or running tasks for the same software update stay intact.
The Install Software Updates task settings override all Default Software Update Plug-in Policy options, except for the notification options. Depending on the notification options that you define for the Default Software Update Plug-in Policy, users can also get a message that notifies them about the start of the software update cycle and see the progress of software update installations in a separate dialog box.
AeXPatchUtility:
In addition
to the new Install Software Update Tasks the AeXPatchUtil.exe
found in
C:\Program Files\Altiris\Altiris Agent\Agents\PatchMgmtAgent (if installed in
the default installation path) got some new features.
Before 8.5 RU2 the AeXPatchUtil.exe doesn´t wait for completion instead it exits immediately. With the Release of 8.5 RU2 the AeXPatchUtil.exe has a new option to wait for results of the update installation.

In the next Release (8.5 RU3) things are changing slightly… but that´s a story for another blogpost :).
Please take a look at my Feature Request for the new Install Software Update Task: https://epm-blog.com/2019/10/18/enhancement-request-patch-management-software-update-task/

Hi,
nice blog!
Did you try this Task in an Deployment Job?
Because in our Deployment Job the Task is still failing. 😦
Best regards
LikeLike
Hi twister12
Thanks for visting my blog!! 🙂 Hope you like it!
Yes I have tried it and it works but I´ve read some other post that this is failing if running within a job.
Did you open a support case on this? Could you send me some details about your Job?
https://www.symantec.com/connect/forums/install-software-updates-task-errors
LikeLike